Showing posts with label tips. Show all posts

Monday, April 5, 2010

Making dull light pop

It is no secret that I am a big proponent of using flash to augment or even over power natural light. In this case I wanted to show a side by side example of using flash vs no flash to augment a photo, in this case to add to the feel and enhance a theme I was shooting for.


ISO 100 1/250 second F/8.0 with two rim lights behind Wes (the model)

The photo on the right is of course enhanced with flash, while the photo on the left is natural light only. The day was overcast which is a nice light, but in this case not the kind of light I wanted for this type of photo (over cast = even but flat light). I needed something edgy and hard.

The ambient was underexposed by about 2/3 of a stop with the flash on the hot end of the exposure spectrum. The images are straight from camera with only a minor White Balance tweak.

Moral of the story, flash is a tool, to help you achieve the style and look you are working toward.

Sunday, February 14, 2010

Photowalking Utah studio event

This year I had the honor and privilege to give back a little to the photographic community, by hosting one of the many studio setups at the photowalking utah studio event this year.

There must have been around 200 photographers at the event. I wanted to share a quick little write up about the setup I used and a little of why. Hopefully this will be a helpful reminder of the setup for those who may want information for future reference.

First off a diagram of the setup:


The setup I used doesn't formally have a name, though I have seen it used by other photogs in a similar fashion. The setup is very specular with a 3D quality, and at the same time soft. The setup also changed ever so slightly during the shoot (the diagram above and result shown directly below is the light as it evolved to the final state). I would be remiss without thanking Scott O. Smith for helping with gear and setup!

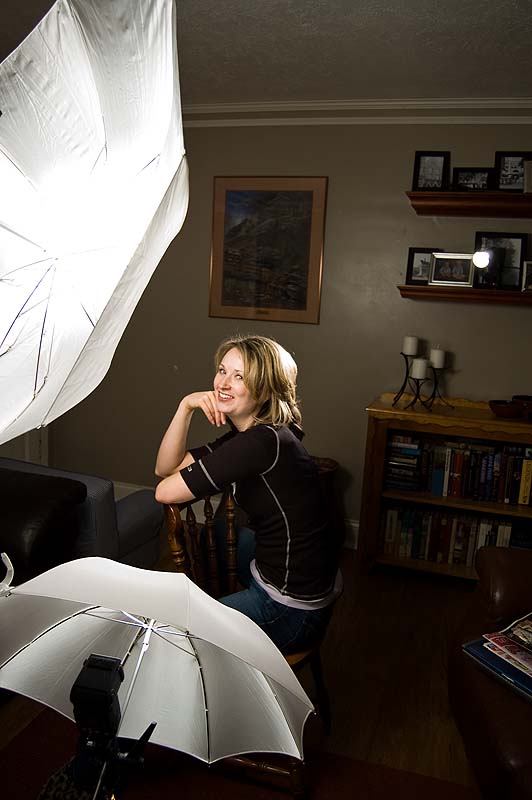
The setup consisted of two rear lights modified by soft boxes (one octa and one square). These create the rim lighting or lighting that creates the highlights in the hair and the sides of the face. Above (represented by the grey see through circle above the model) was a gridded beauty dish and a small silver reflector below. The beauty dish above combined with the reflector lights the face in the opposite direction as lights from behind. The beauty dish is what creates the highlights on the nose and chin. The only light visible as a catch light is that of the small reflector from below which mainly acts as fill.


A tighter crop of the above. See the light patterns...


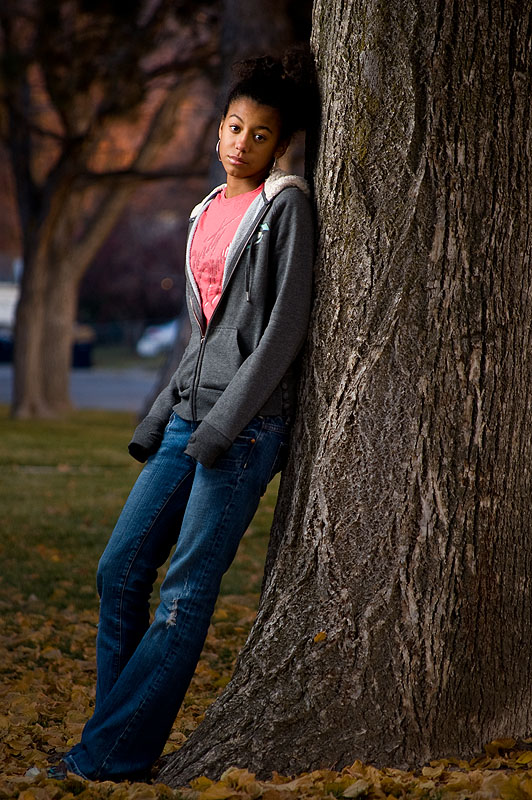
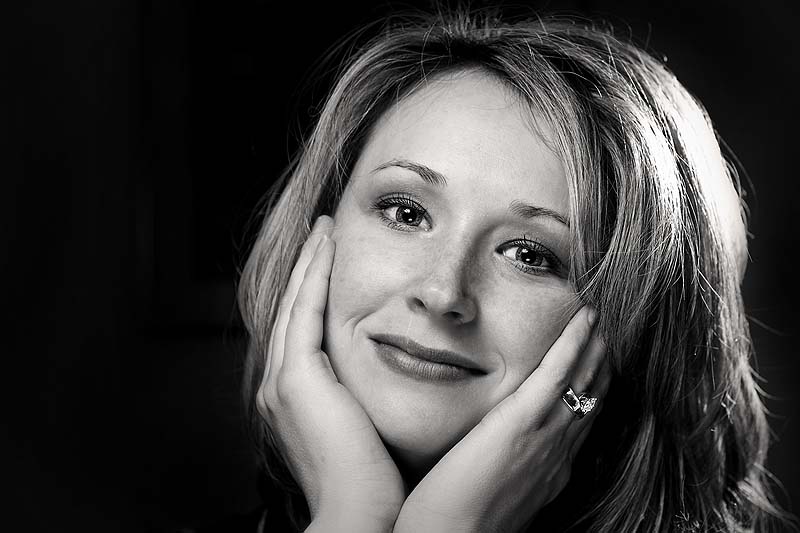
The photo below is the exact same setup, except the beauty dish was moved about one foot back toward the back drop (again the beauty dish is the grey circle in the diagram above). Big difference right?


The lighting technique used was very precise, and requires for the model to be placed just so in relation to the location of the lights. Movement of a couple of inches creates a different look. In general studio lighting is precise, when compared to natural light (though this setup was more so than most). Moving the model slightly will change the light. The power of the light is very dependent on the distance from the model to the light source. Generally larger sources and having your light source further away from the model allow for more freedom of movement, but also require much more power to use.

Wow that was a mouth full...

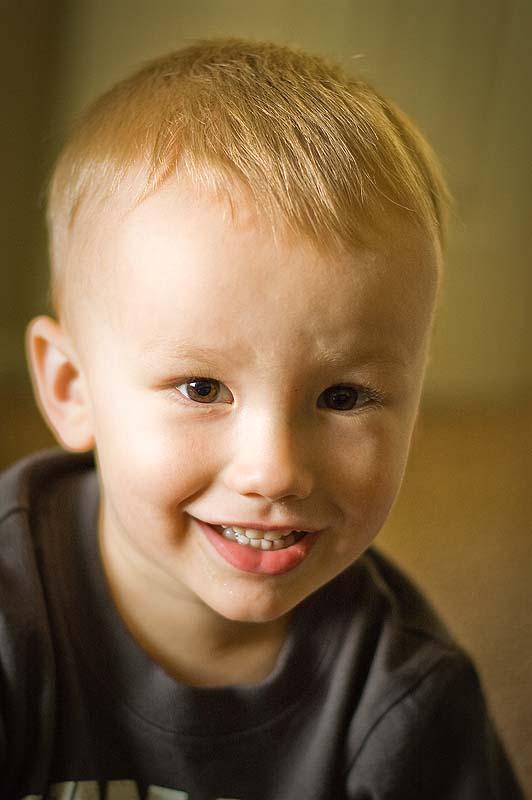
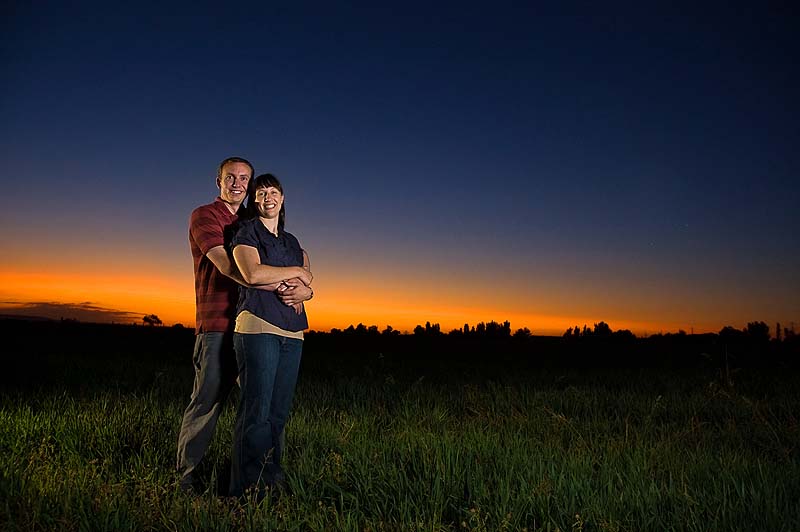
So that was the how, now to the why: The light setup was intended to be "edgy" and "specular". This isn't a setup for doing family portraits. I wouldn't want this setup for cute little kids. This setup would be awesome on a guy with lots of hard features and a cut figure (think James Bond, Daniel Craig who my wife thinks is the hottest guy on the planet). It would look good on Male or Female athletes.

But honestly that is what is so cool about studio lighting. You can change it in million little ways do get different looks. I could reconfigure (using the same equipment) the lights and bam, I am ready to baby portraits etc. I was asked by about every other person who came through the line to shoot at the setup I was hosting, why I had the lights where I had them. I tried to explain what I explained above. That first, I setup up the lights to get the edgy look you see above, and second, you learn how to setup your lights as you use them (experience). I knew this setup would be edgy because I've used it before.

Now for some fun shots:


The first is of Scott Jarvie(Hit the link to see learn more about the shots). Amazing the fun look you can get from a ring flash and a Ultra Wide Angle lens.

One more of Jeremy:


Monday, June 29, 2009

Second shooter for Scott Jarvie

Last weekend I was able to be a second shooter with Scott Jarvie. Jarvie was gracious enough to let me follow him on a wedding shoot.

My intention was to sponge all the info I could out of Scott about wedding photography. Actually there wasn't much sponging as Jarvie was giving me tips at a near constant barrage. First off I want to thank Scott for being Scott. You really need to get to know the man to understand why I say that. There are a few people in this world that you want to be around because the exude fun and Scott is one of them. You can't help smile if you are around the guy for very long.

First thing I learned from Scott. Be the wedding couples friend. Sounds simple but I could see the respect and love that Adam and Jessica had for Jarvie. They thought they had the best wedding photographer in the continental US and probably the world (I think they were close to right on this one).

Scott with the soon to be wed couple

Another thing Scott explained to me was how important it is to be in control. You want people to think (even in moments where you yourself are confused) that you know what you are doing, that you will take care of them. You can't be timid, tell people what they should do and why.

In the words of Scott, "Talk the the bride before hand tell her where we should do the group photo (the location you found that has best light and is best for a group). Don't tell her there are other options, just tell her it is the place that will work for the large group photo. Once you are done talking to the bride, tell the group that the bride wants the group photo (everyone) done at the location you picked." Because the bride wants the photo done at the location there is less grumbling and things move more quickly.

One of the million little golden tid-bits that Scott shared!


Another lesson learned: You're going to need that wide lens. Wide lenses tend to make people look well wide, but sometimes it is all you can do. Also if you try to go long instead of wide, you may end up with photos of the back of the groups head as everyone crowds around the bride and groom with their own cameras.

This one was big for me, I love to shoot long and shallow. Had to go wide...


Get to know (quickly) key players. If mom makes a lot of the decisions make sure that you get on her good side to help you with crowd control. If the bride is the decision maker then learn to work with her so you can make her day her's.


So you might ask why no actual how to take picture tips?

Well here is the tip: Don't try to learn photography at a wedding. I now this seems obvious but Scott pointed out that some people ask to shoot with him at a wedding because they want to learn to shoot better. There are so many places where it is easier to learn. Shoot at birthday parties, family events, your own home. Experiment and learn every nook and cranie of your camera and how it works. I wanted to learn business aspects of photography from Scott. A wedding is not the place to learn new techniques, but is the place to put into practice all the techniques you have learned!

OK now for a few pics from the wedding:


I guess I was feeling like a black and white day...


I loved the expression on this bored little kid ;)


OK a few color images:


Friday, May 1, 2009

Vivid skies

I have been asked a number of times about how I get my skies to look the way they do. Now I want to preface this by stating that I don’t do landscapes (at least not very often), so I don’t think that this is an area where I am particularly skilled or excel at.

Stump The stump was lit by fill flash off camera right, bare strobe with a half CTO attached

I like to shoot people photos, so when I think of wicked cool skies I think “Wow, that killer sunset would make a great back drop for a portrait”. However I am totally willing to share my technique and the little experience I do have.

Be at the right place at the right time:
First thing is a no brainer, but it is the hardest part; be where there is a great looking sky. Experience is a big part of the equation, but anyone who stops to think about it will realize that great skies usually happen in the evening and the morning. Great skies usually don’t happen at noon. Things like haze and clouds can indicate that the evening or morning is going to bring a good looking sky (think of the color from haze and the contrast added by thick clouds). The key is to be in the right place at the right time. Though even fairly bland skies can look pretty intimidating when exposed and treated properly (more below).

This photo of my son was lit by three flashes, two can be seen in the photo acting as rims, with one main shot through an umbrella, the background was under exposed about 2 stops

Watch your exposure:
Interesting skies are tough, because there is so much dynamic range. Dynamic range is a measure of the brightest part of the scene compared to the darkest part of the scene, and today’s digital cameras just can’t capture the entire amount of dark to light how we see it with our eyes. Either the dark parts will go black (under exposed) or the bright parts will go white (over exposed). If there is a lot of foreground the camera will tend to over-expose the scene, and if there is a lot of sky you will likely get the opposite.

For the sky, I tend to push the exposure negative from what the camera thinks it should be. I either do this by reducing the exposure compensation or more often I shoot in manual and decide on exposure based on what looks good to me (the bad is under exposure often results in increased noise).

Back to the original statement, if the camera can’t capture the range of brightness of the scene how do you shoot to get proper exposure for the entire scene? There are a bunch of tricks that photographers have developed to help in these circumstances. For people pictures the thing I usually do is to add fill flash. I use fill flash off camera through a light modifier like an umbrella, however you can do a decent job with the on camera flash. If it wasn’t for flash this couple would have been the same brightness as the surrounding landscape (I'm talking about the black region way behind the couple). The flash brings the scene into a more even lighting that the camera can handle.

The lighting on the couple comes from two flashes set opposite each other, one bare strobe on the peoples backs and a flash shoot through umbrella as main

Use software to blend exposures:
Another option is to use software like Photoshop to blend different exposures of the same scene. I often use this method combined with fill flash to get the sky to pop. I will expose the sky just to the point where I am keeping detail but the sky is too bright, this gets the foreground close to the correct exposure but the sky is a bit over exposed. Later in post I will darken the sky to the correct exposure (This is a good reason to shoot raw as blending exposure is really made easy in a program like light room or adobe bridge).

I don’t bracket exposures (take pictures with different exposure compensation) often, as it just doesn’t work with people. Some might suggest HDR software but I haven’t ever used HDR software.

Use special settings to process your files:
Most cameras have a vivid setting or something similar. I shoot Raw, so I can adjust the files in post by increasing the vivid slider and the clarity slider. You can do much the same thing when shooting Jpeg by increasing the vivid setting in camera. The blues and greens will get more punch. In raw I use a vivid setting of about 30 to punch up the sky, much more than this and things start to lose touch with reality.

One light setup with a flash shoot through umbrella as the main, notice how little the ambient was dropped, but still lots of drama

Increasing clarity increases the midtone contrast. This slider is great to make the different shades of grey in clouds really pop. Clarity however can do awful things to people’s skin. That increase in midtone contrast will make wrinkles pop (not a good thing) in the skin.

Now you know how I do it, hope you found something useful!

Wednesday, April 8, 2009

EXIF tip

Here is a quick tip! Many photos on the web contain EXIF data intact. EXIF (exchangeable image file format) is part of a photo that contains information such as shutter speed, aperture, ISO, focal length, camera used, lens used and the list goes on and on.

I like to use Opanda exif viewer (its free). The EXIF viewer only works if the photo you are looking at has EXIF intact. Some processing removes the EXIF data.

Once Opanda is installed, an option appears on images when you right click View EXIF/GPS/IPTC with IExif.


From the EXIF info you can see this image was shot at *F 1.8 *ISO 320 *1/80 sec *Aperture priority *exposure comp +1 *focal length 50mm, plus a whole bunch of other information you wouldn't need to ever know.

There are a lot of other free EXIF viewers out there, find one so you can see what settings were used to get that cool shot you've been eyeing (I know I do)!

Tuesday, March 10, 2009

The gear I use and how I use it.

I get e-mail etc about the gear I use on a fairly regular basis (I don't claim to be an expert or pro, the explanation below is my experience, yours may differ). Usually the question is “what camera do you use”. I respond that I use such and such camera, and that is the end of the conversation (most of the time). So many times it easy to believe that the camera is what creates great photos (after all the camera manufacturers tell us that when they market the cameras to us). The right question to ask when you see a great photo, is to question how that person took the photo, how the photographer used the camera.

My intention in sharing my gear is to help out in understanding what benefit I get from the different pieces of gear I use. I want to show how I use different pieces of gear in my bag.

One suggestion: if are serious about photography, get a DSLR. Any brand will do but a DSLR gives you flexibility that you can’t get from traditional point and shoot cameras (though some are getting close)

My cameras:

I use a DSLR (note that most manufacturers have equivalent bodies, lenses etc. sorry this is so brand specific). I started out with the D40 which I still use today (yup the beginner DSLR by Nikon), and later bought a well used D70 camera body off ebay (mainly for the 18-70 kit lens and because I wanted a second body). As far as I am concerned the camera body makes the least impact on your photos compared to other photo tools you could acquire. Some will argue the point, I don’t have any experience with the expensive bodies so I am unqualified to comment on bodies. From my view point the camera body isn’t where you should focus your dollars. When you get the other items (read below) then upgrade the camera body.

My gear
Click on the photo above to see notes on the photo

My lenses:
I really only use three lenses for my shooting, the 18-55mm doesn’t see much use anymore. Not because the 18-55mm is inferior, the 18-70mm wins due to the lens hood, slightly faster aperture and better reach. The other two lenses I use are the 55-200mm VR and the 50mm 1.8 Nikkors. These are the lenses I use and have. The lenses are cheap, and they work well.

So this deserves a side bar… Am I happy with these lenses? Sort of, they are great because they are light weight and compact (I will keep them when I upgrade lenses so I have a light weight travel kit), but they aren’t fast (I mean that they don’t have a big aperture). Ultimately I want some 2.8 constant aperture equivalent focal length lenses of the two zooms mentioned above (I am just a little financially impaired).

So why use the 55-200 VR?
To get that shallow depth of field and compression you get when shooting at 200mm. Can you get this from other lenses? Yes but most cost a lot more.

A long focal length like 200mm can make the background seem like it is right behind the subject (compression) but look soft like creamy butter (shallow depth of field). This shot of Airen was taken using the 55-200mm at 200mm, see how the background is like a soft painting?

Sad against a tree

Why use the 50mm prime?
For that 1.8 F stop. When I shoot with this lens it is nearly always wide open aperture. I want that low light goodness. Shooting beautiful natural light usually requires a lens that is fast like the 50mm 1.8. Again you get some great soft backgrounds, this time because the aperture is so big (1.8). The bad is that you really need to be careful how and where you focus otherwise the important part of the pic will be out of focus. Notice how the photo below son's eyes are sharp and in focus but the rest of his face is quickly falling out of focus. Hall mark of the 50mm at 1.8 aperture.

Clayton

Why use the 18-70mm?
For the wide end and for all the normal angles you might need. It just works well, though it doesn’t have any pop except when wide (when I say pop I mean that at most focal lengths it is like vanilla ice cream a bit boring but still the most popular flavor). If you shoot landscape then you want wide 18mm or wider. I don’t so I don’t have any ultra wide lenses. Here is a wide example, notice how everything appears in focus? That is where the wide bodies excel. Here is an example of a photo at ~18mm.

Brittany and Jake

My lights:
I have an SB600 for the on camera stuff (I don’t use direct on camera flash much opting to bounce of walls etc), and use two older (very worn and beat up) speed lights for my lighting (planning to add a fourth light soon). This was due to a suggestion from David Hobby (Strobist) to buy used and I think I made the right decision. I don’t worry too much about the lights (SB 24 and SB 25), and just use them as the tools that they are.

Lighting is sometimes a hot topic (some think it is cheating). Suffice it to say that natural light can be wonderful, so use it when you can find good light. If you don't think lighting is interesting then skip the rest of the gear post...

Lenses are easy to explain but lights are a whole other beast. Suffice it to say that learning about light is what photography is about. Cameras capture light. I don’t know what more to say except just use it and do it. The more you do it (take photos) the better you will get! Now I don't want anyone who reads this to think that you have to use flash or strobe light, natural light can be the best light you will ever find, but learning to use lights can help you see natural light better, making you a better photographer all around.

Start simple, when learning to light, I suggest starting with a single light and then building up from there. After a while you will start thinking in terms of two, three, four and more lights, but I suggest starting with one. In fact most of time I use one light because I don’t want a shoot to get to complicated.

Here is a behind the scenes photo (indoor and a little more complicated).

over under light setup

Here is the result.

Anji BW

Light modifiers:
As you can see I use three different umbrellas sizes 60”, 43” and 33”. Light size is a huge part in the quality of your light. Most of the time you want soft light as it is more flattering. Soft light is achieved when you have a big source relative to the subject (more about it here). The 60” umbrella is great at providing real soft light. The 33” is a little more edgy but still is much softer than a bare flash.

Remember I said the light source size relative to the subject size, so a 60” umbrella 10 feet away will look as soft as a 33” umbrella shot at 3 feet away. Move the light in close to get uber soft light.

Other stuff:
Light stands, clamps, triggers (to trigger the flash when of camera) are other stuff I use. I use a couple of Bogen nano light stands because they are really compact and easy to haul around. Filters to change the color of the light etc. You can really spend a lot of money on extras.

One last note; there is so much more to photography than the gear, such as posing, framing, color, and the list goes on and on. This only touches the gear aspect which is a fairly small part of the equation. Getting all the right gear only gets you so far, the gear after all are just tools, you are the artist using the tools!

Hope this helps out!

Sunday, February 22, 2009

Tips for better self portraits

January, I participated in a photo challenge over at photochallenge.org. The challenge was to capture a self portrait for every day of the month of January. As time went on I learned a lot of things that I thought I would share. Of course it is not the first time I have done self portraits.

Equipment:

While any camera will do for taking self portraits, using a DSLR gives you the most flexibility. I will talk more about lens choice as part of the regular discussion.

Pick up a tripod. Nearly any tripod will do so I won’t go into much detail here.

Pick up a wireless remote; if you are using a Nikon or Canon camera there are remotes available for the less expensive DSLR that cost about $20. These things are a real time saver and make it easier to fine tune your self portrait.

Shoot tethered, most cameras have a mini video out. I borrowed my son’s DVD player (the one he watches movies in the car with) on multiple occasions. This is where the remote comes in great; you can fine tune the composition by watching that little monitor, without having to move and then find your place again. If you have a newer DSLR with an HD out then you could hook up your laptop.


Example setup for a photo done in my garage.

Lighting, a single flash can do wonders for your portraits. I won’t go into any lighting details (I will save that for a different day), but photography is about capturing light. You don’t need to buy a flash, I first started learning lighting using work lights. You can pick up a small but powerful work light from home depot for around ~$15.

Coming up with ideas:

I all ready talked about gear, time to talk about technique. I think where most people get stuck on self portraits is the coming up with ideas (I know I struggled here). What really got me going was thinking about what I have and how I could use it in a photo. Now I am not just talking about props, but I am talking about features also. One of my prominent features is my bald head. So could I work that to my advantage?


Another (as regularly stated by my wife) is my lack of short term memory, so a theme showing my powerful mental capabilities.


Just thinking about the things I like to do, inspired all sorts of photo themes. In fact when I sat down and listed items, I quickly had more self portrait ideas than I had days to do them in.

Environment, sometimes my environment inspired the image. For instance one night of January was extremely foggy.


During the month of January my wife was very pregnant (more environment).


Creating a theme:

Two items make a photo, the subject and backdrop, and I think that they are equally important. This is where your lens choice comes into play. A long lens (large focal length) allows you to send the back ground out of focus and narrow down the amount of background in the photo. A short lens (small focal length) keeps the background in focus and allows it to be a key part of the image. Other times you just want to keep the background plain so all the focus goes to the subject. The background is still playing a big factor by not distracting from the subject.


Dress the part. In fact the clothing was a big part of my inspiration for any particular image, so you could say it was what set the theme and I just had to act the part. Two simple articles of clothing I used included an old brimmed hat and my leather work gloves. Though the items were small and pretty common, I think they created a big impact.


The examples of the work gloves and hat are just examples of items I had. Maybe you have a robe, or an axe, a ninja sword, whatever just go use it.


Portray emotion:

Want your photos to look boring, well then act bored. The facial expressions you make are huge in setting the tone of the photo. This is where having a tethered setup can really help. Aim for over the top, I mean really go crazy. The more emotion you show the better the photo will turn out.


If you are trying to act angry, then clench those muscles and yell. If you want to look like you are happy then laugh out loud.


Look at your photos:

When you are done look through the photos and see what worked and what didn’t. Make notes about what you liked and didn’t like. Enjoy looking though the photos. If you do it right your going to love it!

Thursday, January 1, 2009

My tips, hints and thoughts on photography

This is where I will collect all of the how to articles created by me. These are my thoughts and things I wanted to share about photography. I've moved the incomplete list that was located at the sidebar, and replaced it with a single link. I will update the list as I continue to share.

Thinking about wedding photography? Here somethings I learned shooting with a Pro Wedding photographer: Second Shooter for Scott Jarvie

Want to get better looking skies? Here is what I do to get better looking skies: Better looking skies

This tip is a quick tool to help see how other people took their photos: Exif viewer

I get occasional e-mails about my gear, what I use and how I use it. Learn more about what I use here: My Gear and how I use it

A tutorial I wrote after a month of taking self portraits. Here is what I learned with some great looking photos of me: Better Self Portraits.

Cameras are getting better, but there are still times when the cameras built in meter will get it wrong. Watching a few of the built in tools of your camera can help get better exposure. This is the way I watch my exposure.

Short on money, well you’re not alone. Instead of buying a macro studio try out an old milk container. Macro studio on zero budget

This photo generated a lot of interest, and here I explain exactly what I did to get the star trails and share a short story of a camping adventure at the same time. Natures Independence Day show.

I missed the Utahphotowalking group in June. So I had a chance to explore a little. Plus I talk about a little about some light painting I did. Photowalking June at the Great Salt Lake.

A video clip from Dove about true beauty and how digital photography may have distorted our view of beauty. The drastic makeover

One way to quickly figure out how a portrait was lit. Reverse engineer light

A quick little discussion on my photographic state of mind and what I did to get over a photo rut I was going through.Creativity boost

Very basic explanation of soft versus hard light, and how to find the light. lighting quality

A very basic explanation of the things like shutter speed, aperture, ISO (sensitivity) and how it all works in setting exposure and the look of the photo. More about taking better pictures

Early example of me trying to create better portraits by simply changing my perspective. How to take better portraits

Sunday, August 3, 2008

Getting better exposure

I use lots of manual metering but I usually use Aperture priority. One thing that I have learned is that it is really easy to fool the camera’s built in light meter. When I shoot (all modes including manual), I watch two things in the camera, the blinking highlights and my histogram. I try to get as much info to the right as possible without blowing out important details.


The reason to do this is two fold. First it just plain looks good especially when shooting portrait style pics. Making sure that the scene is exposed correctly is what separates the average from the better. Second, due to the way that a camera sensor captures data, the first half of the data bits is used to capture the first upper tier of light information. Confusing?

I will put it this way; say that your camera can capture 8 stops worth of light (see here if you are confused by the word stop of light). The camera captures that 8 stops by dividing its bits (data) into 8 different segments one for each stop. The catch is this, it isn’t an equal division instead the camera keeps ½ of the data for the first stop of light, in this case the brightest stop. Then it gives half of what is left for the next stop of light and so on. Imagine you only had 256 bits of data for your image the 256 bits would be broken up like this:

Brightest
Stop1 - 128 data bits
Stop2 - 64
Stop3 - 32
Stop4 - 16
Stop5 - 8
Stop6 - 4
Stop7 - 2
Stop8 - 1
Darkest

First thing to notice is that there is not much data for the last stops (dark areas). Another thing to keep in mind, if you try to bring up the light level in post you will often get a lot of noise, but decreasing light level in post isn’t such a big deal (as long as it isn’t by a lot). Part of the reason for this is that you just don’t have much data in those dark areas. There isn’t any detail to retrieve in the darkest regions.


I don’t know for a fact but I am sure that any DSLR will have at least a luminance histogram. Here is the next secret when using that histogram, or watching the blinking highlights. In order for that luminance histogram to be accurate you need to be at the right white balance setting. If not you may be loosing data that you didn’t know was there.


Last thing to keep in mind is that histograms come in all shapes and sizes. There are times when you want the histogram to be at the very left end of the spectrum. Don’t worry about the shape or how well the histogram is filled out. The histogram is just a helpful feature, not an exact measure but is a guide that requires personal interpretation. Other times you may want a histogram that clips at the right end, like when you have shiny metal objects in the image or something bright like the sun. Just remember to have fun...

Monday, July 14, 2008

Macro Studio on NO budget

I wanted to try out macro photography but needed to do so on the cheap, so I bought some close up filters (25 dollars at Ritz). One thing I quickly learned is that I wanted really small apertures to get everything in focus or at least as much as possible in focus. This meant using a lot of light or long shutter speeds. I of course opted for increased light. You put that strobe close enough to your subject and even at the lowest setting you have more light than you could ever ask for.

I had to come up with cheap way to create beautiful light and I was thinking green. So what did I do to save the environment and get that killer light I wanted? I used a left over gallon of milk.

Bonus; if you cut the carton right you can keep the handle. Another slick thing about these milk cartons is you have built in raised pedestal for whatever it is that you plan to take photos of. It is like the dairy industry knew that there are thousands of poor photographers out there looking for a simple solution to their macro studio needs.

Here is the setup…


You can see I am using a basic cross lighting technique but shooting through the milk carton. I plan on trying a whole array of lighting angles. It is so easy to make minor adjustments. Some of the shots I used a 1/2 CTO filter to warm things with a custom WB to get different lighting feel.

Once I cut the top off the milk carton and everything was all setup, I needed a subject. Lucky our home has a lot of flowers that are available for testing out the macro studio.


Manual F29, 1/40 of a second WB set to custom, ISO 200

Yup, F29 is the aperture and this was still blowing out. Strobes were set to about 1/32 power. Why such a slow shutter speed? No reason in particular. At this shutter speed without the strobes the pic would be a very dark grey.


Manual F25, 1/80 of a second WB set to custom, ISO 200

So simple a cave man could do it…

Sunday, July 6, 2008

Nature’s Independence Day show

We spent the holiday (July 4th) at Monte Cristo camp ground. The plan was to spend a few days enjoying the great outdoors but as life things don’t work out as planed and we came back early. Clayton had a stomach flu that kept us all up all night. I don’t want to go into the gory details but the little guy spent the night puking all over everything we brought up for him to wear and sleep in. He also vomited all over his parents clothing and sleeping bags. It was a horrible night that we couldn’t wait to end.

Because we left the campground early I didn’t take any photos of the campsite or people etc. I was too busy the first day cooking and setting up camp to really take many photos (of course I did take some). Nana and Papa arrived late on Thursday just in time for dinner. We ate, sat and talked for a bit while Clayton played in the gravel/dirt with his trucks. We couldn’t get him to eat any food (should have been our first clue to the night that was to come).

It was a beautiful night, sooo quite and peaceful; it was very much a paradise (except the plethora of mosquitoes). After everyone went to bed I stayed up for a moment to enjoy a breath of the fresh air and enjoy the solitude that can only be found on the top of a mountain. The stars were breathtaking that night (I had forgotten what stars look like outside of a city); I had planned a little photo shoot of the stars with the giant firs as a fore-drop (why don’t people use the term fore-drop often?).

Digital photography provides its own set of challenges when taking photos. One thing that film excels and digital fails to do well, is long exposures. When I say long exposures I mean exposures of more than a couple of minutes. I wanted a long exposure to get star trails, so I did the next best thing…


Nature's fire works

Set to Manual ISO 400 Aperture 3.5, shutter bulb ~200 seconds each; 7 exposures combined in PS Elements, WB custom

The photo is actually a composite of 7 exposures, each about 3-4 minutes long. Do the math and the total time of the shot is about 21-28 minutes long. If I had taken a single image for that time length using digital, the noise would have become overwhelming (the sensor in the camera continues to heat up during the exposure adding to the noise). Additionally the battery power required would have been significant (think of all the noise reduction going on in the camera and it builds the longer the exposure. Here is one of the 7 combined images below.


There is one more thing that is different about the photo you see. The trees are back lit (light is shinning toward the camera onto the back of the trees). This was another trick used to add drama to the photo. During the three minute exposure I walked behind the trees and painted the back side of the trees. The WB was set to give a cool feel (almost tungsten) setting. Of course the flash light used to paint the back of the firs creates a warm light (tungsten).

It was great start to a bad night…

Saturday, June 28, 2008

Photowalking Utah June Great Salt Lake

The Photowalking Utah event for the month of June was held at the Great Salt Lake. Everyone met at Saltair at 6:00 o’clock that evening. There were some who were late (myself being one of them). I was sooo excited to meet with the group that evening but when I got there late (almost didn’t go as I have been feeling under the weather), it was one of those moments where I had to decide to make the best of it. I couldn’t find the group; I searched frantically for a short time then I wanted to cry like a lost little girl. I ended stopping near an old abandoned building. I started by hanging around the building hoping I would see the group drive by.

Inside the building, a couple of kids were spray painting the walls. I was actually very impressed by the artistic value of the graffiti they were creating. I had to get a photo of someone in the building; it was just too neat of a location to pass up. If you don’t know by now, my favorite photographic subjects are people. I didn’t dare ask the kids to pose for the photo as I thought that their activity was likely illegal and they might want to keep their anonymity, so I used myself as a model holding a spray can like I was the master painter. At least I got my best side…

Graffiti Exposed using Manual 1/400sec ISO 200 at F11 (used sunny 16 rule to determine exposure for outside the building), WB set to sunlight. Used three strobes to light up the walls and myself (to bring up the exposure inside the building to match outside). Camera left I set up a strobe with a ½ CTO filter, the strobe to the right used no filter. The two strobes were set at a cross lighting type of style. A third strobe was placed in the broken wall with a red filter. I know the model is not the haut man what you are used too; ever since I stopped using buns of steel…

Then I decided to start the walk down toward the lake (much further than I thought). I found several interesting photo opportunities along the way. I don’t think of myself as a landscape photographer type, I hardly ever go out and shoot landscapes, but I had a lot of fun. When shooting landscape photography one of the difficulties is capture the dynamic range of the scene. The sky often turns out too bright and the ground too dark. This is because of the limited dynamic range of digital cameras (film cameras suffer the same problem, they can only capture so much of the contrast that exists in a real scene). This especially becomes true as you hit twilight (think how the human eye has problems seeing at the time of the day). My solution was to put the camera on a tripod and bracket. I then combined the photos later using Photoshop Elements. Photographers who do a lot of this type of photography often use graduated neutral density filters (this is a filter that is half dark and half clear, you place the dark portion over the bright sky to allow the camera sensor to read the scene more like our eyes are able to), I don’t have graduated ND filter so I used a digital darkroom equivalent.

Stump Single exposure, I used a flash (gelled with a CTO filter camera right) to bring up the light on the stump in the foreground. Without flash the stump would have been black. I set the WB to sunlight and shot around F14 at 1/100 of a second (aperature priority) at ISO 200 and +0.7 exposure compensation.

Two exposures used one exposed for the foreground and one for the sky. Additionally I used a flash (gelled with CTO filter camera left) to bring up the light on the piers. I set the WB to sunlight and shot around F13 shutter speed varied by bracketing.

Old equipment A different technique was used on this old wreck which begged for its photo to be taken. I used a single strobe fired once for each of the multiple exposures used to light up the old vehicle. I walked around the vehicle and lit up the vehicle from different angles using one CTO gelled strobe. I then combined the exposures in Photoshop elements. Following is one of the photos I combined in Photoshop.


You can see my strobe on the right side of the frame. I moved around the old wreck lighting it up as I went.


After seeing the Photowalking group photos, I have decided that I need to visit the spot where the group met. I plan on making a trip down to the Great Salt Lake soon and I am taking the whole family. Stay tuned for some awesome slick family photos!