
This post has been sitting as a draft for months. I decided to finally wrap it up and publish it. Enjoy.....
There are many factors that make a photo great but there is one factor that really is king… Light. Think what the master of light Rembrandt did. His understanding of lighting has inspired many an artist and photographer. So much of photography is dependent on lighting but so many people seem to be confused about how lighting affects their photos. Once you get the basics of lighting down, you will have all the tools to improve your photos and get that look that the really great photographers get (well maybe a lot practice will help a little). You will be able to look at a photo and have a fairly good idea how it was lit and what you need to do to replicate the same look. I have divided lighting into three key aspects that come together to make that perfect image, and because there is so much that can be said about light I will be discussing this topic in a three part series (remember to take any advice I give with that large grain of salt, I am after all the king of BS). The three key components of light are:
- The relative size of the light source
- The direction or directions of the light source
- The coloration of the light source
Good, now we have that out of the way you can be off and running with all the lighting tools you could ever ask for! For those who may want a little more direction read on.....
Relative size of the light source
Have you seen those photos that have that soft appearance, you know the angelic look? Well there are probably several things going on in the picture that give it that feel but one of the leading features is the light source (duh you say). Large sources of light give a much softer look to the photo, where as small sources of light give a harsh look to the subjects of your photo. The bigger the source, the softer the look of the light on your subject as the light fills in the wrinkles and imperfections of the face.
Hey you say I know the perfect light source for soft light.... the sun, it is huge! Well no not exactly, the sun is a large light source but this is where the relative part comes in. If you look at the sun (don't do this, as a photographer your eyes need to stay in tip top shape) it looks fairly small. This happens with any source of light. Move it far away and it becomes smaller (works with people too). Remember we decided that small sources of light give a harsh light. This is why those family portraits we took at the park, in the noon day sun don't look as good as we hoped for. So what to do?
We need a light modifier for the sun. If you see photographers they will often do crazy things to soften the light coming from sun or other sources that aren't ideal.
Take light that comes from a strobe, I personally like to bounce it off of something like a wall or an umbrella, or whatever might be handy. With the sun we don't have many options but there are a few things that we can do...
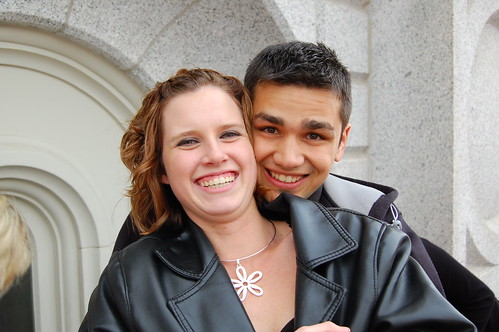
Cloudy days are great for people pictures. The clouds act like one huge light modifier making our light really soft and purdy. To take full advantage of a cloudy day, try not to show the sky in your photo. Then people won't realize it was a gloomy day. Look how good my little brother and his wife look on a cloudy day.
Move into the shade. Basically you are using reflected light to light your subject when you are in the shade. Light is coming in very diffused from the sky, the mountains, trees, grass.... you get it. This is what makes Clayton look so good in the photo below. Well Ok the light is only 10 percent. The rest is the great genes he got from is mom and dad! Shoot your pictures early in the morning or late in the evening often called the magic hours by photo enthusiasts. When the sun is low on the horizon two things happen. First the light has to bend to get to you and with that bending the light looks bigger (think back on your experiences with the moon and sun.. they always look biggest when they are on the horizon). Second the light becomes less intense thus light reflecting off of surroundings act as fill light giving a really pleasant feel to the photos.
So you say, I should always try to take photos during the magic hour (near sunset or sunrise) or move into shade to take the photos? Yes.... Well not exactly. Sometimes hard light is good, like when you are taking pictures of a wanted criminal to show your kids. That hard light will make him look meaner and your kids will be that much more afraid of him.
So perhaps there is still some confusion as to why big light is better (when I say big I don't mean strong but big in size). Maybe it is time for a visual.
Ya I know my diagrams are mind botteling (think Will Ferrel in Blades of Glory). You should compare the two diagrams and just think what is really happening? Notice there is one photo where the stick man gets happy.... Ya the one with the bigger light source. That big nose isn't going to stick out like a sore thumb because the the light comes from many directions and fills in all around the nose. You won't notice scars or wrinkles as these well not stick out as much. The photo will be much more pleasant to look at all around.
Well what about taking pictures inside a house? You can really get some great light in your house if you know what to look for (remember a large light source). Now don't eye that desk lamp, think big I mean bigger! Think those big bay windows or other large windows that are located on the north side of the house. Ok maybe the windows are not on the north side of the house but the point is you don't want direct light coming in from the windows but instead you want that diffused light that comes in from that window. Just open the blinds to let the light in and shoot away. In fact some photogs will only shoot with available light because it can look so good.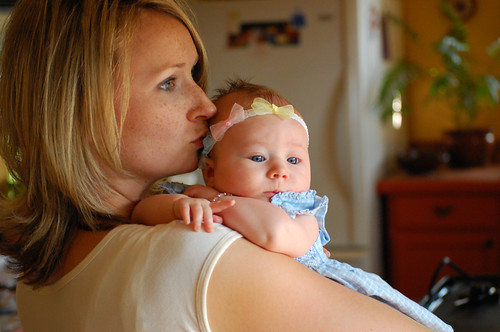
Here is another available light photo (window light) of Clayton.

I love this photo and it is all available light coming in from the back patio door at Kelly's house. The bad is that the light may not be very strong and due to the low light levels pictures of your hyper kids might turn out blurry (for help on this look back to the post about exposure).
So your photo setup may look like something like this:
Well its time for a pop quiz!
Let’s assume you are taking a picture of your uncle Pinocchio who has a rather large nose (remember that uncle of yours is a chronic liar). He doesn’t want his nose to over power his portrait and he knows you can take his picture and make him look like a million bucks. So, what kind of light do you want to use?
- Take his picture in the noon day sun with no clouds in the sky. You can put a really cool mountain in the back ground and no one will even notice his nose because of the great back drop?
- Take his picture under a really thick tree that puts you in the shade?
- Take his picture in your house using that 5oo watt desk lamp you just bought to light him up like a roman candle?
Hope you said 2! If you passed the quize you are ready to take on the photographic world and show em your stuff!
Next time we will pick up where we left of and talk about the direction of light sources, and the coloring of the light.


No comments:
Post a Comment